Hello! Sorry for the lack of postings, we have been on the move!!
Lately I have had a couple of requests on how to use my sculpting tools that I have up in my etsy store.
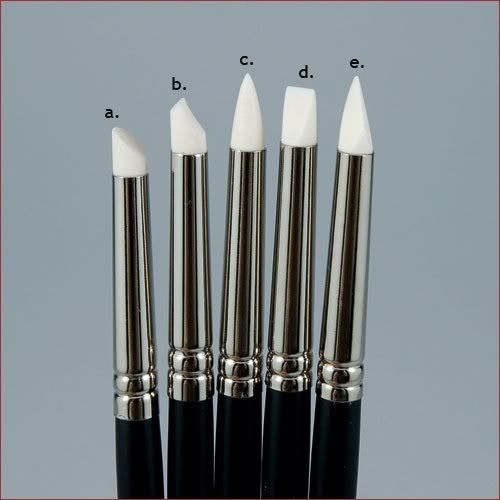
Every artist uses their tools differently, and every one has his or her favorites. This set is my favorite, it is made of silicone, and therefore is flexible and can create heat- like a mini set of fingers. I use them wherever my fingers cannot reach. There are two sizes, one for minis and one for full size sculpts.
Let me preface this in saying that these are not my only tools, in fact I have WAY TOO many. You really can’t have enough
tools can you?
I probably have to do another post about each of my tools for you guys one day. For now, these are my primary sculpting tools:

If you look at the top photo, each tool is labeled a-e. I will let you know how I use each of these as follows:
A: Cup Round Tool- I use these tools for smoothing areas that my fingers cannot reach, like near eyes or around the ears. Because all of these are flexible, it is like an extension of your fingers. Can also be used to smooth new clay onto your piece.
B: Cup Chisel- This one is my go to tool for making lips and adding indentations into the sculpt for the beginnings of wrinkles. As you may know, a lot of people just dig lines into their sculpts as wrinkles but for a more realistic look, wrinkles are a three step process for me. This is step one. This tool is also good for detailing ears. And around the nostril.
C: Taper Point: By far my favorite tool. I use this one for almost everything. Nostrils, in between finger and toes smoothing, detailing, adding ridges to the face. This one is actually Step three of my wrinkle process. I will detail it a bit below.
D: Flat Chisel: i use this one mostly for smoothing out a sculpt by dragging it back and forth until the clay blends in. Also wonderful for pushing things in place, such as small pieces of clay, detailing the ear, adding wrinkles in the mouth etc.
E: Angle Chisel: My second favorite tool. I use this for Step Two of my wrinkles/ fat rolls. Also great for adding eyelids, carving out the mouth or the nose. Pushing clay into place.
So, that is just a basic synopsis on how I use my tools. Of course you can use them interchangeably as you are learning!
As for my wrinkles- I use the Cup Chisel to first outline where the wrinkle or fat rolls is to be. Not too deep at first. Then using the Angle Chisel, I mark out the wrinkle or roll as deep as I wanted it to be. Remove excess clay if needed. Lastly, I use my Taper point to go over the wrinkle or the roll and smooth it out a bit so it is not as harsh. And for the finish BLEND and SMOOTH with your fingers or your tools if you cannot reach.
One tool that isn’t included that you will need is a chopstick or something similar so that your sculpt doesn’t get scuished in your warm hands as you are trying to sculpt. Put the head on the stick like a lollipop! 🙂 your not so squished sculpt can thank me later. 😉
If you may be interested in a set of your own silicone tipped tools you can find some in my etsy shop: weebabiesnursery.


